How Do You Draw a Hair Bow Step by Step
 While we're on the subject of girly design, I might as well add in bows to the fray as well.
I like bows. They're cute and simple to draw, but come in a variety of ways and have many interesting designs.
For now I'll focus on two main types of bows: the thicker bow (usually tied with large ribbon) and thinner (usually by cord or thin ribbon).
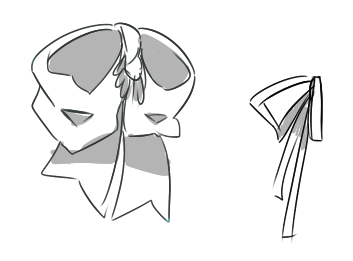
First is the thicker bow- I typically see it more often on clothing and on hair, since it looks more "cute".
 I've numbered the steps for convenience:
- Start with the center.
- Draw triangle shapes to represent the folded part of the ribbon. The more angled, the more professional it looks, like a bowtie.
- Draw in the tail ends of the ribbons. Personally I like the spiky ends, but it you don't it's totally up to you. By this point it looks pretty good, but not as good as it can be.
- Add in details. The drawing kinda dumps everything in so I'll break it apart bit by bit what's going on.
- The center is becoming more rounded and bulkier to represent the knot. There is an indent in the middle, and the sides become curved.
- If the bow is more like a lolita bow, there should not be a line down the middle; heck, sometimes you could leave it as is without adding curves.
- The sides of the bow curve towards the center, giving it a heart shape. Don't make it totally heart-shaped, however; give it a bit more angle, and make the tips sharp. Sometimes I like to add a bump where the indent is in the center.
- For wrinkles, I make teardrop shapes near the center, with the point at the knot. I also add hook shapes in the bottom to represent the fold in the ribbon.
- Be careful; depending on the perspective, the hook might be better on top, on the bottom, or none at all, but they should never be on the top and bottom in the same bow.
- Not too much to say on the ends of the ribbon because nothing really changes. Just be wary about the width of the ribbon ends; they should be just as wide as the sides; it doesn't need to be exact, an approximation would do.
- The center is becoming more rounded and bulkier to represent the knot. There is an indent in the middle, and the sides become curved.
- Clean up and shade in. For shading, the most important parts to hit are the center (fill in the teardrops, basically), the hooks (fill those in to make an oval), and where the ribbon sides overlap with the ends. Shade in the sides if desired, and if you do, the shadow's on the bottom.
That's a lot for the thicker bow! But once you've got the swing of things, you can probably belt them out in a minute.
The thinner bow is more formal-ish on clothes such as school uniforms, but it doesn't mean it's not cute when it needs to be.
 Again, I'll add clarification, although this one's a bit easier:
- Draw the center.
- Draw triangle shapes for the sides.
- Draw a smaller triangle in the inside to produce the cord. Make the top line of the smaller triangle extend until it hits the outside triangle, or stop a little before. Do not make the the other two sides of the smaller triangle extend. This is done to provide shading.
- Add in the tails; make sure the cord is about the same width as the sides of the bow.
- Shade where applicable. Usually it's done below the top line.
And that's about it! Simple, isn't it?
This is more advanced, but here are a few tips to make your bows better:
 Keep gravity and perspective in mind. If you're looking at it from the side, or from up top, make sure to position the bow to match. If it means you won't be able to see a side, go on ahead! And be mindful of the weight of the cloth; realistically, the sides of the bows might droop a little, so draw the triangles for the sides downward. If you don't, there's no harm in it.

Frills on bows follow the sides of the ribbon. (For those wondering how to make the frills, I made a tutorial for it.) I'm admittedly guilty of this when I first started out, but frills should not stick out of the bow. Rather, they should follow the length of the ribbon. If you do it like the wrong one above, it implies that, somewhere along the ribbon, a line of frills just jut out, and that's not how it works. Keep in mind, though, that the frills on the tips of the ends of the ribbon (whew!) is acceptable.
Also keep the ribbon in mind when there are patterns in the ribbon.
As a quick reference for lined ribbons:

So that's about it so bows as I'm concerned right now. As a staple to a lot of cute dresses and hairstyles, I think it's important to at least get the basics down pat. Soon you'll be able to achieve a variety of designs all over the place. It's just a matter of practice!
Any questions or comments? Feel free to add a comment below!
How Do You Draw a Hair Bow Step by Step
Source: https://theanimepalette.wordpress.com/2015/06/08/how-to-draw-bows/
0 Response to "How Do You Draw a Hair Bow Step by Step"
Post a Comment